
How to Install Custom Procreate Fonts on Your iPad


How to Install Custom Procreate Fonts on Your iPad Read More »
First thing’s first, you’ll need to install fonts on your device! You are able to import fonts that are TrueType (.ttf) or OpenType (.otf) on your iPad.
To get started, if you purchased your font from me, you’ll need to download your purchase, and if necessary, unzip the folder. Most newer iPads have this capability built right in. If you’re working with older software, you may need to download a file extractor.
It’s pretty easy to install fonts in Procreate itself (as opposed to your iPad as a whole where the fonts would be available in any app that accesses your system’s installed fonts).
Tap Actions > Add > Add Text. Once you’ve typed the text that you would like to use, tap Edit Style > Import Font. Navigate through the Files app on your device to the folder where you saved your custom font. Tap on the font file to import the font, and it will appear in the Fonts list in Procreate.
Bonus Tip: If you also have an iMac or MacBook, you can share an .otf or .ttf file with your iPad by Airdropping it. You can then select what you want to open the font with – if you choose Procreate from your list, it automatically installs it for you.
See what that looks like below!
If you choose not to take the easy route outlined above, you can install the fonts using another method! This method below ensures that the fonts are installed directly on your device, rather than available only through Procreate. This method would be handy if you work in Procreate, as well as other apps, like Design Space, Illustrator App, etc.
IMPORTANT: Please be patient and aware of the fact that I, personally, do not make the rules + processes needed for font installation on your iPad or iPhone. I only create the font files, and have literally no control over the operating system, your device’s capabilities, or the rules the developers put in place for a process like this.
I will always recommend that the best experience with my fonts will be on a desktop or laptop machine.
That said, it is absolutely possible to use my fonts on an iPad or iPhone, but you must follow the process below, which includes downloading the files, extracting the files, and a few different steps using third party apps.
Your new font(s) will need to be installed using the iOS configuration profile. While there are ways of doing this without an app, it’s easiest to do this by using a font app that configures/installs your new fonts for you.
Using apps like AnyFont, Font Installer, iFont, and other font apps will allow you to download your font file and package it up so that it can easily be installed on your iPad or iPhone. You can install multiple fonts or choose one font to install!
For the purpose of this set of instructions, I’ve chosen to work with iFont – it’s free to use!
This is what the interface looks like!
With some font apps, like the iFont app, you may be able to download Google fonts directly within the app from the font libraries. However, you can also download your Google fonts or custom third party fonts directly from your browser!
You would only need to follow the general download process as you would for any other downloadable file, unzip if necessary, and make sure you know where you saved the file!
iFont has an option to “Find Fonts to Install” — tap that, and then use “Open Files.” Navigate to where you downloaded the font file! Select the font you wish to install.
I’ve chosen to work with my font Grateful Season for this blog post!
After this, it’s smooth sailing! Next, install the font!
In iFont, you can do this by tapping “Installer” at the bottom left corner. It should have a little red bubble to indicate the notification – the red bubble will disappear when you tap.
When you tap Installer, you’ll see the font(s) you selected to install on the left side of your screen with a blue “Install” button. Tap install!
You’ll get a pop-up within the app after this. When prompted to open a configuration profile in your settings app, tap “allow”. Depending on your iPad settings, you may be prompted to enter your passcode.
After you do that, you’ll get a notice that says that the profile was downloaded, and it instructs you to review the profile in Settings if you wish to install the font. When you tap “Close” on the notice, you’ll find a set of instructions for what you need to do next. Follow those instructions! (You can tap “Cancel” in the upper right corner of the pop-up to get rid of this before you go to your iPad Settings.)
You will receive a warning that the profile isn’t signed with a key because it was generated on your device. But don’t worry! You can see for yourself by tapping “More Details” and viewing exactly what’s inside: simply the fonts installed by you! A screencap of what that looks like is below!
Continue tapping Install for any other windows that pop up.
Now, tap “Done” when you receive the notification that it was installed.
Now that you’ve installed your custom fonts, they will appear beside the default fonts in Procreate in the font list. Simply choose your font in the list and use it to your heart’s content to enhance your illustrations and designs!
Pro Tip: If you’d like to use the alternate characters in the font, you can download the paid app Unicode Character Viewer. The app is .99 cents, and will allow you to look up fonts installed on your device, copy the glyph you’d like to use, and then paste the glyph into Procreate.
If you’ve decided that you’ve had enough of a new font and want to remove it, you can navigate to Settings > General > Profiles. Here, you can select a font profile and tap “Remove Profile” to remove the font from your system.
If you think a video demonstration would be more helpful to you, I have a video of how to install fonts for Procreate here. Additionally, if you’re interested in the process to use special characters in Procreate, you can find that demonstration here.
How to Install Custom Procreate Fonts on Your iPad Read More »

Let’s talk about Canva!
I don’t use Canva much…or at all…because I’m a total Adobe girl. (It’s basically necessary for me to create my fonts & SVG designs.) But if I wasn’t a designer, I’d totally be using Canva.
In short, Canva is a browser-based graphic design program that makes it easy for users to create their own designs. Canva comes stocked with various items — fonts, graphics, stock images — and it also allows you to upload your own items, as well, to create your designs!
One question that I get frequently is whether or not a Canva user can upload their own fonts.
The short answer is yes!
There are a few caveats, though. This feature is not available for free Canva account users. It is, however, available to Canva Pro, Canva for Enterprise, Canva for Education, and Canva for Nonprofit users. A user can also upload only up to 100 fonts. (If you’ve maxed that out, which is easy to do, you can remove some of your uploaded fonts to make a swap.)
I created a video to show you how to upload a custom font to Canva! If you aren’t certain about whether or not a pro account is right for you, you can sign up for a free trial, which is what I did here in order to show you how to upload a font!
Here’s a breakdown of the instructions for a Canva Pro account:
You’ll be able to find your uploaded fonts whenever you access the dropdown menu where the fonts are located. All custom fonts are found at the very top of the list, under the Uploaded Fonts section! I think it’s really nice and helpful that the uploaded fonts are separated from Canva’s font library.
Once you select one of the custom fonts, you’ll be able to type in it and create an awesome design!
Upload Custom Fonts to Canva Read More »
My love of heart fonts is certainly no secret! I’ve already written one blog post that goes over heart fonts, how to use them, and what some of my favorite heart fonts are, so I figured why not do a post with some fun ideas using these fonts? (Just as an aside, you can see my entire Heart Font Bundle at a glance in the first post!) The use of these types of fonts are on the rise, and since the demand seems to be there, font designers like me are paying close attention to what y’all want!
The heart symbols aren’t really “standard” features in the font, though, so I thought that it might be helpful for heart font lovers to learn a bit about how to access those features!

If you’ve looked at my blog at all, you’ll know about my strange obsession & affection for my font, Autumn Love. Autumn Love, at the time of writing, is the only font I offer that includes heart connectors, which you can use in place of the space between letters. For that reason, I think it’s best to use this font again as we go over how to do the thing, whatever “the thing” may be for you! Personally, I think this font makes a great candidate for t-shirts, mugs, or invitations since the text is a fun, bouncy one & the hearts it uses are whimsical & fun, definitely helping to set the tone for a light & fun event.
Autumn Love is a pretty robust font – the download includes your standard upper and lowercase characters, as well as numbers, punctuation, and Western European Language Support. It’s also PUA-encoded. PUA stands for “private use area” and is essentially a fancy way of saying that each & every character – even the special ones – have a code attached to them which makes them easy to find whenever you use Character Map or FontBook, and access the extra features.
Those extra features, though, are where the fun begins! There are 132 alternate characters in this font, comprised of left and right swirly swashes, left and right heart swashes, heart connectors, and cute little heart icons dotting the lowercase i and j characters. I’ve also included some heart symbols as doodle elements. It also includes 11 ligatures – ligatures are combinations of letters that are automatically programmed together to look best. Take for example a word that has a double t in it – instead of two separate t characters that appear to have overlapping crossbars, the tt ligature shows up as one single character with a single crossbar for both! It’s up to the artist & their own personal style to include extra stuff like this!
You can find Autumn Love here, if you want to check it out!
I highly recommend using Adobe CC software to access the heart symbols. It’s industry standard, as far as professional designers go, so many of you will already have this available to you! Adobe CC software makes it super easy – it’s really as simple as highlighting an individual character, viewing the options available, and selecting the option that fits best for you!
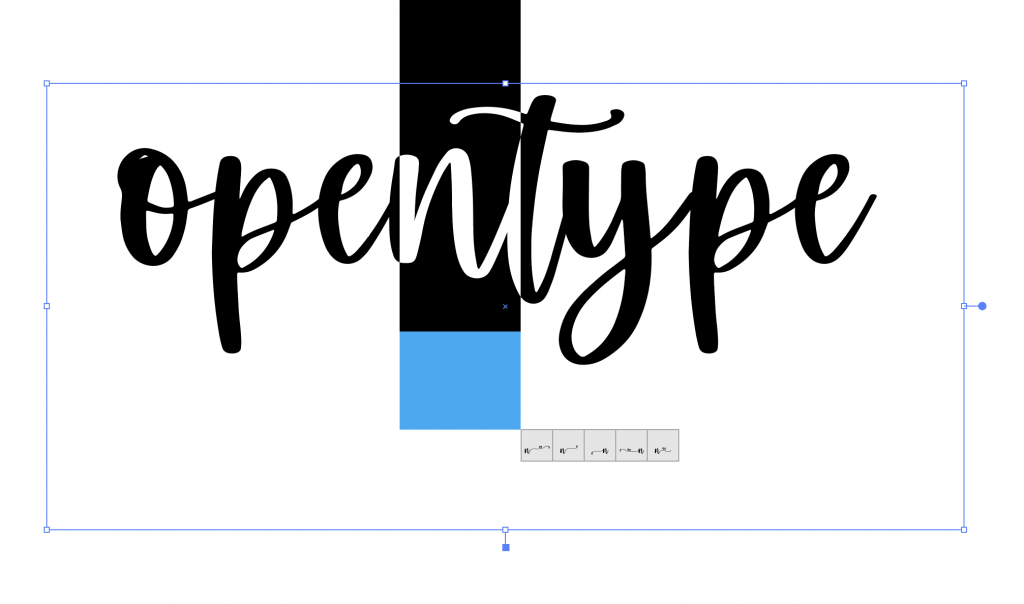
If you don’t have Illustrator or Photoshop available to you, or you’re running an older version than CC, there are other ways to get to those special characters! I mentioned Character Map (PC) and FontBook (Mac) before — and that’s exactly how you’ll get to those extra characters. You can reference my blog post on accessing OpenType features for a full explanation. In short, though, you’ll be able to search & sort through all characters included, make your selection, and then copy paste into the program you’re working in! This is applicable to basic programs such as Microsoft Word, or the Mac app Pages, or any program that you might be using on your computer. This is also how you’ll take your design from just ok and cute to absolutely wow in Cricut’s Design Space. (It’s unfortunate that Design Space doesn’t fully support OpenType features just yet, but hopefully, the developers will make this a feature soon!)
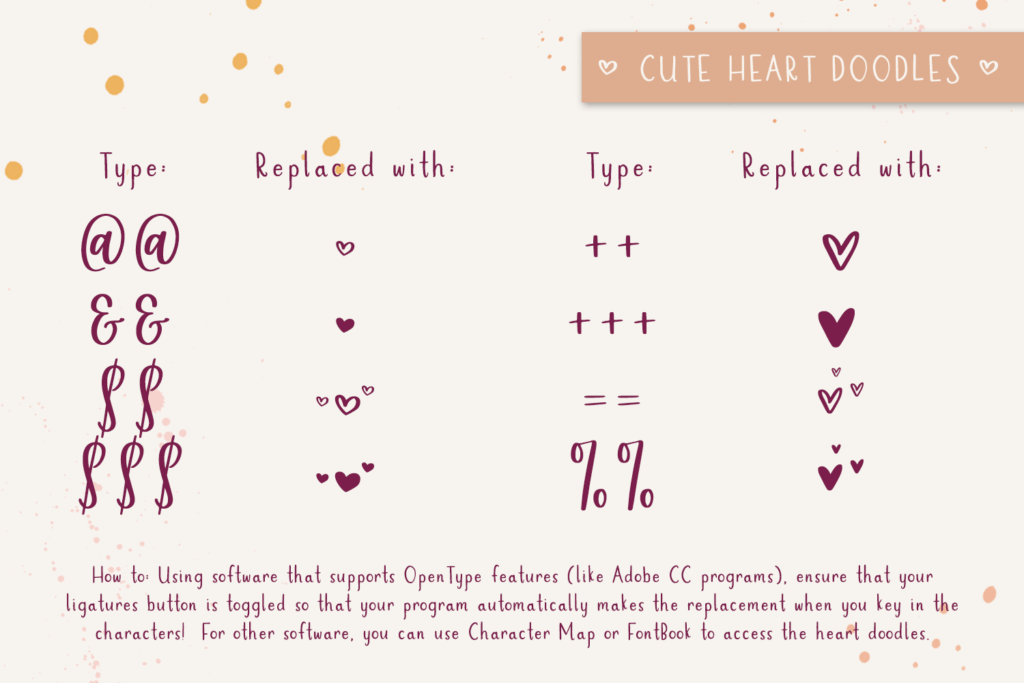
I mentioned that I’ve included some doodle heart symbols, as well. If you’re working in a program that supports OpenType features — meaning, Adobe CC products or other comparable software — you’ll be able to access these symbols easily!
With your ligatures turned on, you can type a few specific symbols, like @@ or $$$. Those characters will automatically be replaced with the heart doodles! I opted to program it this way out of convenience, because sometimes hunting down a symbol is a little tedious. (You can also search for these symbols in Character Map or FontBook, as well, and copy paste them into your chosen program.)
One thing that I love about these doodles is that they fit perfectly with the aesthetic of the font. Because they’re handdrawn, they have a more soft, handmade look & feel than you might find if you were to use something like a heart emoji or a heart icon in a mouse-made symbols font or icon set. There are solid and open versions for each one, as well! Don’t you just love that?!
I personally think that there are limitless uses for a font like this, which is why I put together so many image examples when I listed this beauty for sale! Quote graphics on your Facebook page, Instagram or other social media accounts would be a great fit. Using it on ads or ad items would also be a great use – it’s very eye-catching, and the heart details give it a little extra something that your audience will appreciate!
I also love the idea of using this font for a wedding invitation or a save the date – it already has heart text symbols in it, which makes it absolutely perfect for things that are love-related. If you’re the kinda gal who considers emoji use in these kinds of items, this style of font is definitely worth a look as your plans being to take shape.
Autumn Love would make a great choice to use on a food menu, too! How many times have you sat down to read a restaurant’s menu & it’s just the same, boring font that everyone uses everywhere? If you put your menu together with this font, it’s sure to be a conversational topic, too, which is always a good idea for meals.
This style also works well on a shirt design – Autumn Love does come perfectly paired with a sans, so it takes the guesswork out of choosing a second font to work with. Speaking of shirt designs, I’ve seen this font used quite a bit in the crafting world. It cuts really well on a Cricut machine – I even used it myself whenever I was making labels for my kitchen containers. (Insert a pic here of these)
Logos and branding are a given – I can’t help but try each of my fonts out in a logo mock-up because of where I started my design journey. If I’m happy with the result in a logo, I always think that my customers will be, as well!
Because Autumn Love is also quite legible, even at a smaller size, it would be great for websites, too, or even WordPress theme creation – it would look fantastic on header elements.

Whether you’re in the market for a single font, or a collection of awesome fonts, I’ve got you covered! Search through my shop to find the perfect fit for your next project – you can even test it before you purchase it!
Or, if you know you want a really fantastic deal – over 200 fonts in a single bundle – you can hop right over, and check out my Handlettered Font Bundle!
How to Use a Heart Font In Your Next Design Read More »
It’s been a minute since I offered up a how-to post, so today we’re going to be addressing how to add fonts to Cricut Design Space.
Here’s the deal. Cricut is the machine, and Design Space is the software you’re using. You can absolutely, positively use custom fonts in Design Space! In fact, you can use any fonts installed on your computer in Design Space.
This is a question I get quite often, especially as it relates to my font bundles…and even more specifically, as it relates to my biggest Handlettered Font Bundle. I get it – for a lot of folks, it feels like a little bit of an investment into their crafting hobby or business! You definitely want to make sure that the fonts are going to work with your software first! Since I provide .otf and .ttf files, you’re golden.
Let me tell you how to do the thing!
Don’t worry, though, your project you’ve gotten ready to create is still safe – let me tell you the biggest mistake that Design Space users make as it relates to custom fonts. And before you ask, no, trying to upload them using an iPhone isn’t the biggest mistake I see.
Many of them try to directly upload the fonts to Cricut Design Space.
That won’t work, my friends. This usually results in a frantic email to me, telling me that my fonts “don’t work” in Design Space, they keep getting an error message no matter how many times they try to upload it to Design Space, and it’s entirely the “wrong file type.”
The fonts do work, they are the correct file type – you just need a quick tutorial on what you need to do.
Spoiler alert: It’s really simple.
You need to install the font on your machine first. This is the very first step that you need to take in order to add fonts to Cricut Design Space; I promise, it works!
Let me give you a quick step-by-step on how to install fonts on your computer! (Just as a heads up, you can find this exact same information on my blog post about how to install fonts – this particular post is just a little more geared toward Design Space users!) These instructions will work with any font download that you find, whether it’s fonts you purchased from me, another designer, or even font downloads from a website that offers free fonts for anyone to download!
I provide OpenType and True Type files in my downloads, as well as webfonts. I would recommend working with the OpenType version – it’s the one that ends in .otf in the zip folder that contains your font download!
Once downloaded, you’ll need to access your browser downloads the same way you would any other download. You’ll want to save the files to your computer — the easiest way would be to drag to your desktop. My font files (.otf, .ttf, and web font files) are zipped up together. You’ll need to extract the files first. This should be a simple double click on the zipped up file, and confirming any dialog boxes that pop up.

Once the folder is unzipped, it’ll reveal the contents I previously mentioned. I provide various formats for your convenience, but you will only need to install a single file. I would recommend the .otf file for installation. Double-click the file, or right click on the file so that the menu appears. (Image on the left of the right click option!) Select Font Book when it appears from the Open With menu.
Side note with a little info: FontBook is the program that comes standard on a Mac machine to assist with font installation and organization. It also functions to provide a glimpse of the glyphs that are included in the font.
FontBook will pop up with a little window for installation. Click the “Install” button. Similarly, you can copy/paste the font file directly into your computer’s font folder. Command+Shift+C will bring up your computer. Double-click Macintosh HD (or whatever your hard drive is named), then double-click the Library folder. Within the Library folder, you’ll find the Fonts folder. Paste the font files in this folder – pasting the .otf in this folder means that it’s automatically installed on your system.
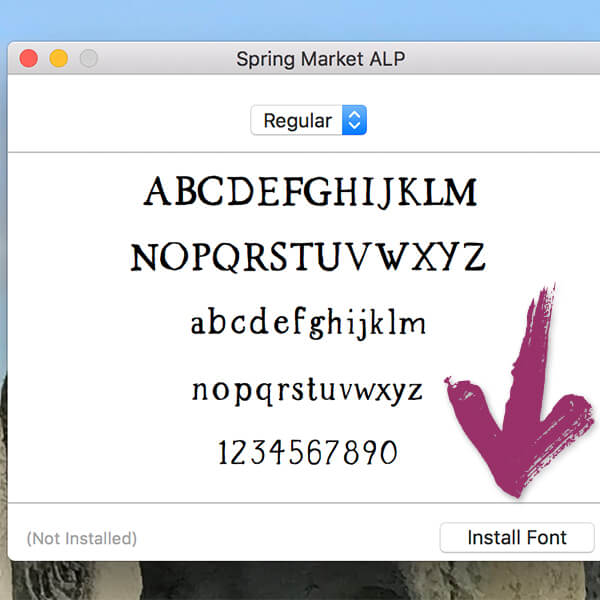
Once downloaded, you’ll need to access your browser downloads the same way you would any other download. You’ll want to save the files to your computer — the easiest way would be to drag to your desktop. My fonts (.otf, .ttf, and web fonts) are zipped up together. You’ll need to extract the files first. This should be a simple double click on the zipped up file, and confirming any dialog boxes that pop up. Overall, the process is the same for any Windows machine.
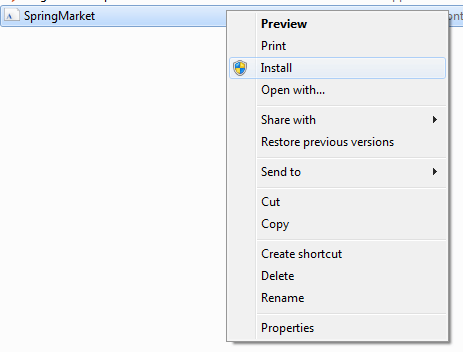
Once the folder is unzipped, it’ll reveal the contents I previously mentioned. I provide various formats for your convenience, but you will only need to install a single file. I would recommend the .otf file for installation. Double-click the file, or right click on the file so that the menu appears. (Image below of the right click option!)
For a Windows machine, you can right click the font file, and then select “Install” from the menu that pops up. You can also copy/paste them into your computer’s font folder. That can be accessed by your Start Menu > Control Panel > Appearance and Themes > Fonts. Simply paste them in there!
I mentioned above that a FontBook on a Mac machine will allow you to view all characters contained within a font. On a Windows machine, you can use Character Map for this! I personally use a Mac for all of my design work, but I have used Windows machines before so I’ve been able to use both programs to tool through font selections!

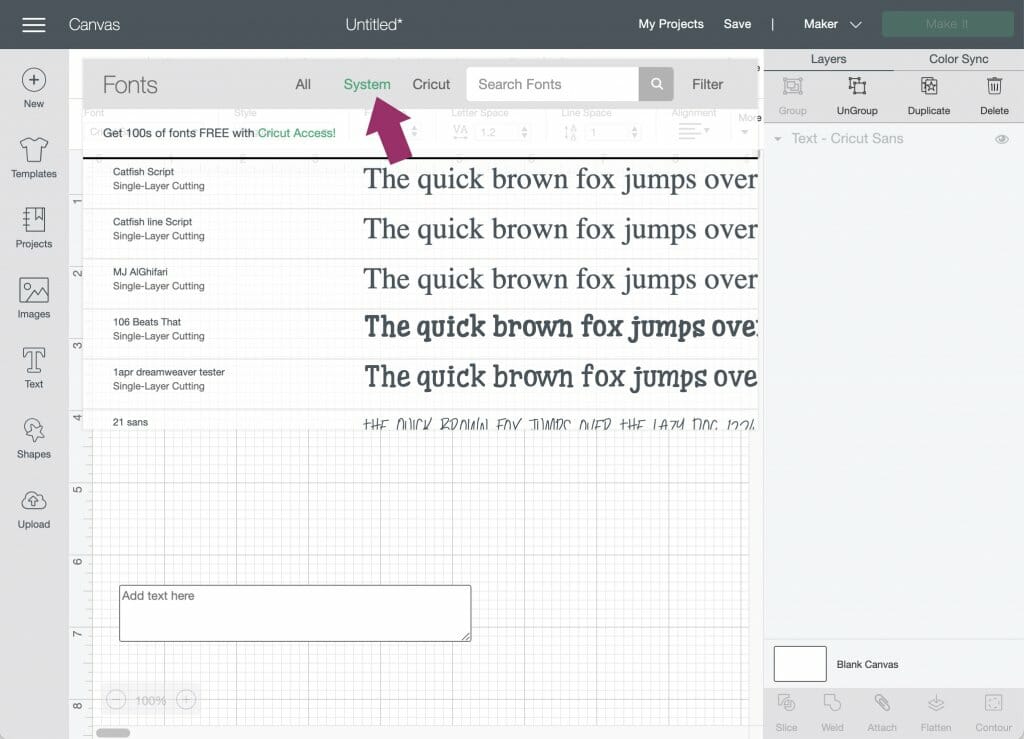
Wait, what does “System Fonts” even mean & how do you use it on a project?
That, crafters, is what Design Space calls the fonts that are installed on your computer. The “system” part is your computer – Design Space accesses what you have installed, so you can use the fonts you downloaded in Design Space! You can filter the fonts you have access to in Design Space by selecting the dropdown menu with the text tool. When you select “System Fonts” it’ll bring up everything you have installed on your machine. Easy peasy, right?!
Give it a try!
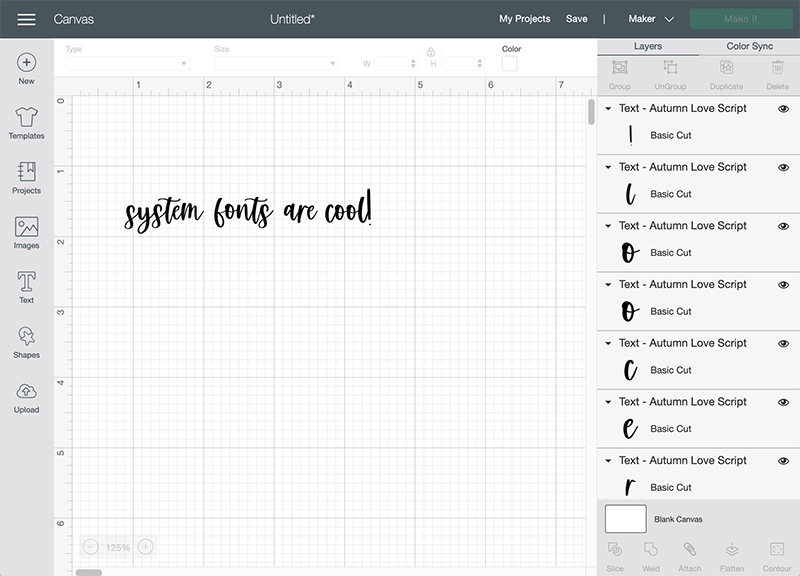
Select a system font of your choice from the font dropdown, and adjust your font size if needed. I picked Autumn Love for this example! I chose a script font for an important reason – this type of font style needs a few adjustments before sending to your Cricut machine for cutting, so I thought it might be a good thing to address.
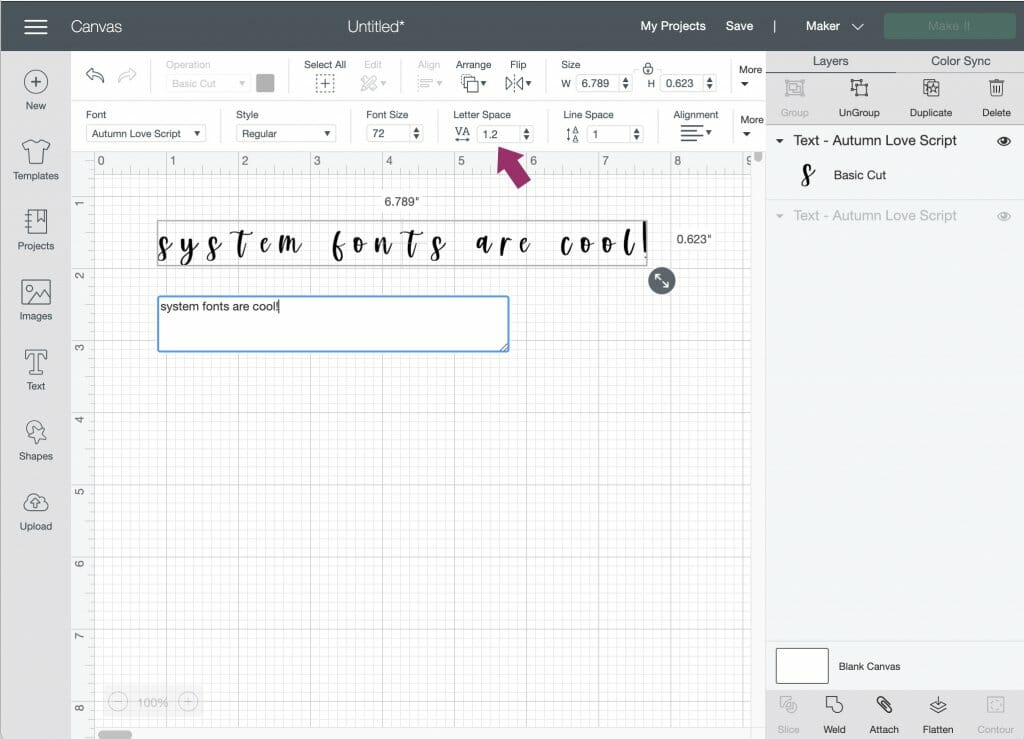
When you select the text tool, a text box automatically appears.
Now, type!
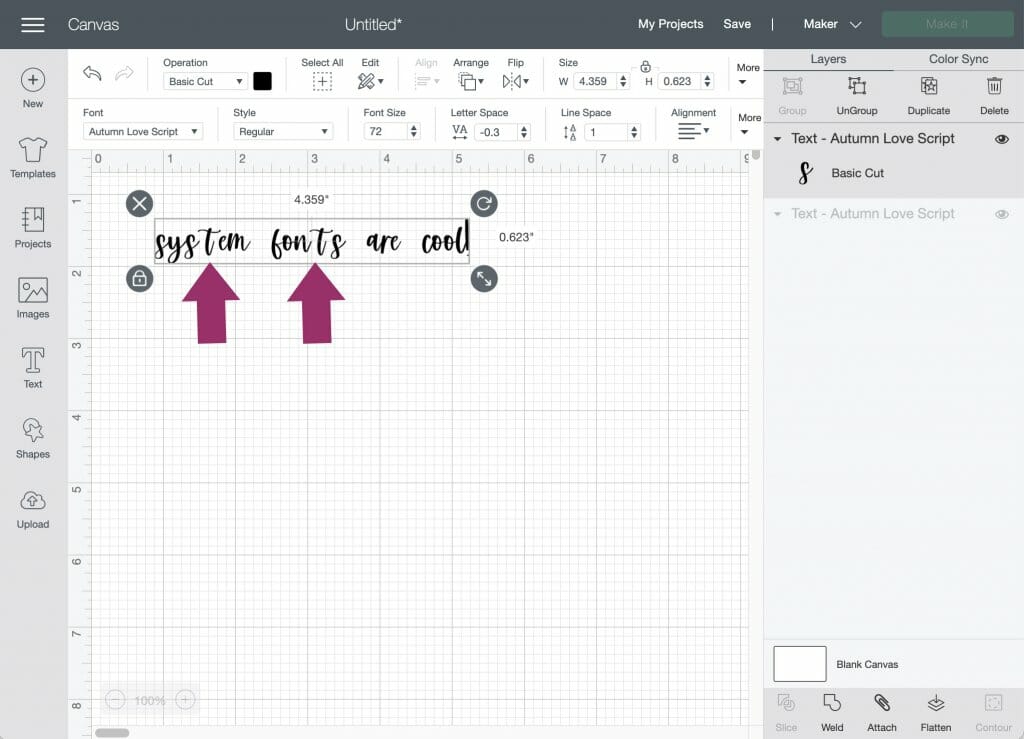
You’ll notice that script fonts have the letters separated. This isn’t “normal” for the font — definitely not the way font designers intend it to look — but this is normal for Design Space. You can adjust the letter spacing pretty easily by making the letter spacing number smaller.
Even after doing this, you may notice some of the letters still aren’t connected – there’s also a simple solution to this. In your Layers panel, click the ungroup button. This puts each letter on its own layer so you can move the characters individually!
Please, for the love of everything fonts, adjust your letter spacing so that the font looks how the designer intended it to. This is probably my biggest pet peeve with Design Space.
You can make use of the search bar to filter your font choices if you know the name of the font you’d like to use, or you can just scroll and find it by the font name!
There are other options in the design panel, but we’ll address how to use those things in another blog post in the future. What’s important is that you’ve got this whole how to add fonts to Cricut thing down!
Make sure before you send to your Cricut machine that you weld the design so that the letters come all the way together as one piece! That is super important whenever you’re using a script font. That’s really all there is to it! Now you’ll be able to use custom fonts for your design projects!
You’ll notice that, in addition to system fonts, you also have the option to select Cricut Fonts as one of the filtering options. Whenever you do, you’ll be faced with a lengthy list of fonts that are available to you, either for free or for an additional (usually small) fee, directly from Cricut.
It’s a quite robust selection, and it does make it quite easy to add to your font collection via the Design Space interface. You can purchase these fonts onesie-twosie, but it’s also important to note that if you have the Cricut Access subscription, you’ll get access to over 500 fonts in Cricut Design Space!
So, what’s the difference between using Cricut Fonts versus finding your own custom fonts, downloading, & installing them? The fact that you get to keep the font files, that’s what! While the Cricut Access subscription is super handy and full of good stuff, you don’t actually get to have the fonts installed on your computer – they’re only available through Design Space. For most folks, that’s not a problem – I would assume that anyone purchasing fonts for their Cricut machine would likely only be using them for the machine…but if you’re a designer like I am, and you routinely make use of fonts in your daily work, it sure is handy to be able to use said fonts in whatever design program you’d like…whether that be using the font in Cricut Design Space, Illustrator, Photoshop…you get the point, right?
OpenType fonts (as opposed to True Type) are extremely robust with features and extra design components, and newer versions of software make it easy to find & use those features. Unfortunately, Design Space’s latest edition doesn’t quite fully support OpenType features as readily as font designers like me would want. (True Type fonts do include the features, as well, but they’re not as easily accessible with that particular file type.)
I often get asked, “How do you get those swooshy lines?” or “Where do I find the letters with the hearts?”
Those are the OpenType features. But don’t worry, you can still use them in Design Space; it just takes a few extra steps. One of my most referenced tutorials is for accessing OpenType features, so I would highly recommend heading there to read about how to get to all of the extra features. In a nutshell, though, you’ll need to locate the special character, then copy/paste the extra characters from Character Map (if you’re using a Windows machine) or FontBook (if you’re on a Mac). It may be a little tedious at first, but once you understand the process, it’s only a few extra steps to take your design from nice to WOW.
I will eventually be putting together a step by step blog post, but there are tutorials that already exist for this type of thing that you can search for!
Check out my Handlettered Font Bundle. Yes, you had to know I’d throw a shameless plug in there. But also, crafters purchase this bundle all the time – it’s got so many awesome fonts in there that are perfect for cutting because they have a super smooth edge. Using handlettered fonts like these give your project an extra special look & feel! I know the number of projects is endless, but I especially love seeing these fonts being used for t shirts and mug designs – I’ve also seen a few crafts where the fonts were used to make lovely greeting cards, which I thought was a great idea!
This particular bundle is awesome because it includes so many fonts – more than 200!! Don’t worry about licensing, either – it includes personal and commercial use, so you can sell the crafts you make using these fonts!

How to Add Fonts to Cricut Read More »

I was fortunate enough to stumble upon a font making course called Learn Font Making, taught by Teela from Every-Tuesday. You can find her course by clicking HERE. The information and support that Teela has provided has been invaluable, and I cannot recommend her course enough. Without a doubt, I would certainly not be able to do the things I’m currently doing without her help!
Teela also offers other courses that may be of interest to you if hand-lettering is something you wish to learn!
How I Learned Font Making Read More »