Beck

Fonts for Logos

When it comes to creating a logo, the font you choose for your logo design is just as important as the design. The right font can make or break your logo, so choosing the right one is essential. Here are a few tips on choosing the right fonts for your logo:

  1. Keep it simple. – When it comes to fonts, simpler is usually better. Use a simple font for your logo to make it easier to read and more memorable.
  2. Choose a font that’s unique. – When choosing a font for your logo, try to find one that’s unique and stands out from the crowd. This will help your logo stand out and be more memorable.
  3. Use a font that matches your brand. – When choosing a font for your logo, try to find one that matches your brand. If your brand is modern, sleek, and professional, choose a modern font. If your brand is more playful and fun, choose a fun font.
  4. Experiment with different fonts. – Don’t be afraid to experiment with different fonts until you find the right one for your logo. Try out different types of fonts until you find one that suits your brand and logo perfectly.

Choosing the right font for your logo is important, as it can make or break your branding. By following these tips, you can create a logo that’s unique and memorable, and that perfectly represents your brand.

What is a logo font and what makes a good font for a logo design?

Every logo has some kind of lettering, whether it’s the name of a business or product, or an acronym. That lettering is known as the logo’s font. It can even be customized into a unique logo font to maximize the brand recognition of the logo!

A good font design should allow your brand to become easily recognizable at all times by anyone who sees you. The font or font pairs should accurately portray the image you want to set for your brand and should be flexible enough to provide consistency throughout all of your advertising materials.

Serif Fonts in a Brand

A serif font is a font style that has small lines coming off the main characters. Typically, they come in groups at the ends of letters and symbols. A logo with a serif/slab-serif font can be bold and commanding, letting people know that this business means business!

Serif fonts are often seen in traditional branding contexts, such as newspapers and magazines. They are seen as reliable and trustworthy, making them a good font family style for businesses that want to convey those qualities.

Browse Popular Serif Fonts for Logo Design

Sans-Serif Fonts in a Logo

A sans-serif font is a font without the small lines at the ends of the characters. This style is often seen in modern branding, as it is seen as more contemporary and sleek.

San-serif fonts are perfect for businesses that want to come across as cutting-edge and innovative. You can use a lighter sans font or a bold sans-serif font to convey different feelings with a variety of font styles. They can also be great for brands that are targeting a younger audience, as this style is often associated with being modern and cool.

Browse Popular Sans-Serif Fonts for Logo Design

Script Fonts in Logo Designs

Script fonts are those that have a more handwritten look to them. They can be used to create a more personal and informal feeling for a brand.

Script fonts can be great for businesses that want to appear friendly and approachable, whether you use a smooth script font or opt for a brush font. They can also be useful for brands that are targeting female customers, as they often have a more romantic feel. However, it’s important to use them sparingly, as they can quickly become overwhelming if overused.

If you’re looking for a font style that will help your business come across as trustworthy and professional, then a serif font is the way to go.

Browse Popular Script Fonts for Logo Design

Get a Collection of Logo Fonts for your Logo Design Project

So, what font style should you choose for your logo? It really depends on what you’re trying to communicate about your business. The perfect logo font will convey who you are, or what your company is or what your company does. If you want to come across as traditional and reliable, go with a serif font. But if you want to showcase your brand’s cutting-edge style with a more modern logo font, try a sans-serif font.

You can get all of the fonts featured in this post, and so many more, by purchasing my Handlettered Font Bundle – this collection of fonts includes over 200 font options, and includes savings of over 99% compared to purchasing individual fonts!

Fonts for Logos Read More »

Fonts with Tails

Have you ever seen a font with “tails” in the design? Fonts with tails are more common than you think, and those extra glyphs really help to jazz up the fonts! The tails on a font are called swashes, and they are extra glyphs in the font.

What Font Styles Usually Have Swashes?

Swashes and flourished characters can be found in any type of font, including Script and Serif fonts. Swashes can sometimes be found on select characters, while some fonts have tails coming off of every letter, both in front of and at the terminus of a character!

There are many fonts that incorporate swashes! Styles of fonts can include script fonts, cursive fonts, serif fonts, and more. The fancy tails on those fonts are awesome for taking your logo or site to the next level!

Check out my font Palm Desert, which has beginning and ending swashes on each lowercase letter.

Script Fonts, and Cursive Fonts, and Serif Fonts, Oh My!

Script fonts usually have swashes worked into the font! These swashes flow smoothly with the script and often include curls, heart tails, and soft curves. Swashes are especially popular on fonts that have a dancing baseline, as they look closer to handwritten words. Script fonts with swashes are massively popular with designs such as wedding stationery, wedding invitations, greeting cards, delicate craft projects, and beautiful feminine logos!

Another type of font that can include swashes, or flourished characters, are serif fonts! It’s not as common to see that kind of font with swashes, but those that are closer to a display style may include swashes. These fonts are usually a cleaner, upscale type of font, and usually include many more glyph options! Take for instance my font Conquistador, pictured below.

Swashes are a great way to add a little extra flair to your display font! They’re almost like the icing on the cake. The swashes will help make your fonts more unique and allow you to really use them in all different types of projects.

So, what exactly is a swash?

A swash is a single glyph that is an embellishment or decoration to add to a letter. But keep in mind that swashes work best when they have been programmed into specific characters rather than being a separate option for every character from lowercase to uppercase.

While many people tend to think of swashes as ornamental flourishes found mostly in script fonts, not all script fonts have swashes. In fact, a point that I want to emphasize here is that while swashes can be used in any type of font, they should be used in specific situations, and should be used carefully within a design.

How many swashes should I use?

The number of swashes that you should use all depends on what you need them for and how significant or ornamental you want your text to be. Generally, the fewer swashes you have, the better. If you use too many swashes and extra tails in text it can become difficult to read, an issue that can easily be avoided.

How would I go about using them?

It all depends on what font you are using or if you want to create a custom typeface for your project.

If you purchase fonts from a professional font designer, these special characters will be programmed in to the Private Use Area of the font. This allows a professional designer to access them easily in industry standard software (like Adobe products), as well as the hobby designer in a variety of programs, like Design Space, by using the Character Map feature to copy/paste in characters.

Should I use free fonts with tails or use premium fonts?

While there are free fonts that feature swashes, the best fonts aren’t typically going to be free. If you’re planning something more important, such as branding materials, designing wedding invitations, or creating a vinyl cutting to display in your home, you may want to invest in a premium font.

Don’t forget licensing!

But, make sure that you purchase the proper licensing! If you plan to only use the font for personal use and not distribute anything that uses the font, you won’t need to worry about purchasing additional licensing. If you’re planning on using the font for commercial use, you will likely need to purchase a commercial license. Check the licensing information on the font that you intend to use!

And do I need any special software?

You don’t necessarily need anything apart from your normal design software, such as Photoshop/Illustrator or Silhouette Studio and Cricut Design Space.

Is access to the character map needed? Yes! Make sure that the software that you’re using is compatible with using glyphs so that you’re able to choose alternate versions of a letter! More professional software options, like those mentioned above, provide easy glyph access through simply highlighting a character to see all options available.

Using Your Swashes

In the end, it’s all about what will look good with your project! Swashes can be difficult to navigate at first, but once you get the hang of it, you can use those beautiful fonts that you’ve been eyeing or have purchased to their full potential!

If you’re in the market for fonts with swashes, flourishes, and a ton of extra goodies, make sure you check out my Handlettered Font Bundle. I love fonts packed full of features, and there’s no shortage of those features here!

Fonts with Tails Read More »

How to Add Flourishes to Fonts in Cricut Design Space

What are font flourishes?

The first definition of “font flourishes” that springs to mind is simply this: decorative letters or glyphs. They are mostly used in calligraphy or digital typography – logos, invitations, or posters, for example. You can work with all kinds of fonts and apply the flourishes to almost any place you want to, if the font includes them.

This font trend has been around for quite a while now, but it continues to be popular among designers who are looking to give their projects an extra little something-something. There are thousands of free fonts online containing these types of lettering elements that you can use!

Check out the beautiful flourished "y" and "e" using my font Grateful Season!

What is a glyph?

A glyph is a specific character in a font, such as an “a” or an “x”. A glyph can also be a decorative letter or symbol that is used in calligraphy or digital typography, such as a swash or flourish.

The term “font flourish” is often used interchangeably with the terms “swash” or “alternate glyph,” but they are not exactly the same. A glyph is a specific character in a font, while a font flourish is a type of glyph that is used for decoration. Font flourishes can be simple or elaborate, and they can be added to any lettering style.

How to Access Glyphs in Cricut Design Space

In order to know how to add flourishes to fonts in Cricut Design Space, you will first need to know how to access your glyphs. Unfortunately, Cricut Design Space doesn’t allow you to see all of the glyphs of your fonts, so you will need to use either Font Book (Mac) or the Character Map (Windows/PC).

(Hopefully this is a feature that Design Space makes available in the near future.)

Accessing the font glyphs in Design Space can be tricky, so the process for PC/Mac is important to note! Once you’ve figured this process out once, it will be much easier in the future!

In order to add swashes to your font, the swash will need to already exist within the font’s glyphs. If the font doesn’t include swashes or special font characters in its glyphs, you will not be able to add flourishes to your font.

While I have PC instructions included in this blog post, the screencaps I’m going to show you are for a Mac computer, since that’s what I use for my design work!  You can also see a video of me demonstrating these steps here.  I’ve also got a video where you can see what it’s like to access special characters on an iPad so you can use them in Design Space.

Accessing Glyphs on Mac

While using a Mac, open up Font Book. You can find this in your Launchpad or by searching for the application in Spotlight Search (⌘ + Space). Navigate to View > Repertoire, allowing you to view all of the fonts’ glyphs, rather than the sample that Font Book typically shows.

Now, choose the font that you wish to use from your list of all the fonts installed on your device. You will now be able to scroll through the included glyphs of the font selected to find the special characters that you wish to use. Select the glyph, then navigate to Edit > Copy.

This is what FontBook looks like and where to access the Repertoire feature to display all characters.

Accessing Glyphs on Windows/PC

While using Windows, you will need to open your Character Map in order to access fonts installed and their extra font characters. You can find this in your Programs or search for it in the Search Bar.

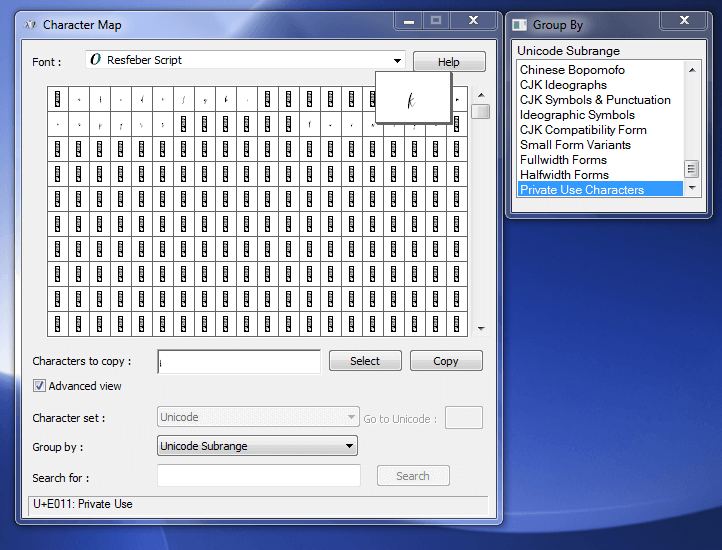
To begin, choose your font within Character Map. After this, choose Advanced View and click the Group By dropdown menu. Here, you will select Unicode Subrange, and a popup window will open. Once the popup opens up, scroll to the bottom and select Private Use Characters.

Now, you can scroll through the alternate characters and choose the special characters that you’re looking for. Click Select > Copy for the font glyph that you want to use.

This is what Character Map on a PC looks like and what you need to select - you can also find this image in my blog post about accessing OpenType features.

Using Special Characters and Glyphs in Cricut Design Space

Step 01

Copy the glyph from your font using the steps previously described within FontBook or Character Map.

Step 02

Now that you’ve chosen your glyph, return to Cricut Design Space where your design file is open. Using the Text Tool, add a new text box to your design and type out all the letters of the design in the same font that you chose your glyph from.

Step 03

Move the cursor to where the special glyph is going and choose Edit > Paste in order to paste your alternate character into the design. Adjust the letter-spacing if needed in order to make the flourish flow with the rest of the font.

Keep in mind that once you use the special characters, if you change the font, the design will change drastically as the glyphs in each script font are different.

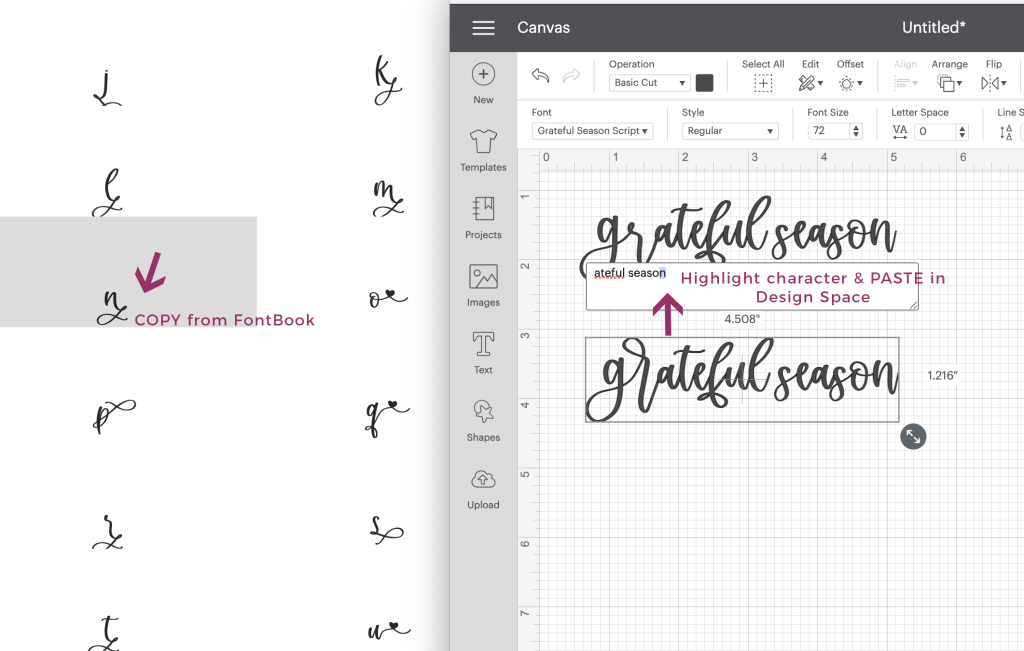
This is what FontBook looks like next to Cricut Design Space when you're trying to add special characters. Simply COPY the glyph from FontBook, and then jump over to Design Space, highlight the character you wish to replace, and then PASTE!

Step 04

Repeat the first step for as many glyphs as you need, pasting them into your design after they are copied each time. Add a new text box for more text or simply build onto the text that you have already typed!

Here's a close up comparison of the final changes. The top text shows standard characters typed out. The bottom text shows what it looks like when the "gr" ligature and flourished "n" were pasted in!

Pro Tip: If you’re using Design Space on your iPad or iPhone, you can download the paid app Unicode Character Viewer. The app is $1.99 (as of December 2025), and will allow you to look up fonts installed on your device, copy the glyph you’d like to use, and then paste the glyph into Design Space.

How to Add Flourishes to Fonts in Cricut Design Space Read More »

How to Download Fonts on iPad/iPhone – Installing Custom Fonts

This tutorial addresses how to download install fonts on your iPad or iPhone. You will need to follow the process outlined below to be able to use custom fonts in apps like GoodNotes or Design Space for your iPad.

IMPORTANT: Please be patient and aware of the fact that I, personally, do not make the rules + processes needed for font installation on your iPad or iPhone. I only create the font files, and have literally no control over the operating system, your device’s capabilities, or the rules the developers put in place for a process like this. 

That said, it is absolutely possible to use my fonts on an iPad or iPhone, but you must follow the process below, which includes downloading the files, extracting the files, and a few different steps using third party apps.

If you’re more of a watch-a-video kind of learner, I do have video demonstrations on how to download & install fonts on your iPad and iPhone.  You can find the iPad one here, and the iPhone one is here.

01. Download a Font Manager

Your new font(s) will need to be installed using the iOS configuration profile.

Using apps like AnyFont, Font Installer, iFont, and other font apps will allow you to download your font file and package it up so that it can easily be installed on your iPad or iPhone. You can install multiple fonts or choose one font to install!

For the purpose of this set of instructions, I’ve chosen to work with iFont on my iPad. At the time of writing this tutorial, iFont was a free app, which is why I chose it. There is a premium version, but I do not own it.

Below is a screencap of what the interface looks like!

02. Download Your Custom Font(s)

With some font apps, like the iFont app, you may be able to download Google fonts directly within the app from the font libraries. However, you can also download your Google fonts or custom third party fonts directly from your browser!

You would only need to follow the general download process as you would for any other downloadable file, unzip if necessary, and make sure you know where you saved the file!

iFont has an option to “Find Fonts to Install” — tap that, and then use “Open Files.” Navigate to where you downloaded the font file! Select the font you wish to install.

Important: Simply downloading the font does not install it. You need to follow the process, outlined below, to install the font so that it becomes available as a font option on your device.

I’ve chosen to work with my font Grateful Season for this blog post!

03. Install Fonts

After this, it’s smooth sailing! Next, install the font!

In iFont, you can do this by tapping “Installer” at the bottom left corner. It should have a little red bubble to indicate the notification – the red bubble will disappear when you tap.

When you tap Installer, you’ll see the font(s) you selected to install on the left side of your screen with a blue “Install” button. Tap install!

You’ll get a pop-up within the app after this. When prompted to open a configuration profile in your settings app, tap “allow”. Depending on your iPad settings, you may be prompted to enter your passcode.

After you do that, you’ll get a notice that says that the profile was downloaded, and it instructs you to review the profile in Settings if you wish to install the font. When you tap “Close” on the notice, you’ll find a set of instructions for what you need to do next.  Follow those instructions! (You can tap “Cancel” in the upper right corner of the pop-up to get rid of this before you go to your iPad Settings.)

You will receive a warning that the profile isn’t signed with a key – that’s normal, don’t worry! You can see for yourself by tapping “More Details” and viewing exactly what’s inside: simply the fonts installed by you! A screencap of what that looks like is below!

Continue tapping Install for any other windows that pop up.

Now, tap “Done” when you receive the notification that it was installed.

04. Use Your Own Fonts

Now that you’ve installed your custom fonts, they will appear beside the default system font list in your apps. Simply choose your font in the list and use it to your heart’s content!

You can use in any app that uses the fonts installed on your iPad! (Some apps may not allow for custom font usage, so it is important for you to double check that the app itself accesses your device’s installed fonts. You can do that by contacting the developer, or by reading through any help files provided by the app.) I’ve got a screencap below showing you Procreate, which is a design app that allows you to use custom fonts!

Pro Tip: If you’d like to easily access the special characters within some fonts, you can download the paid app Unicode Character Viewer. The app is .99 cents, and will allow you to look up fonts installed on your device, copy the glyph you’d like to use, and then paste the glyph into the program you’re working in, such as Design Space or Procreate.

An Important Note:

Although this set of instructions uses an iPad, you can also install the fonts on your iPhone to be used in the same manner. iFont is available for download for iPhones, and you would follow the same basic process described in this post for iPhone installation!

Uninstalling Fonts

If you’ve decided that you’ve had enough of a new font and want to remove it, you can navigate to Settings > General > Profiles. Here, you can select a font profile and tap “Remove Profile” to remove the font from your system.

How to Download Fonts on iPad/iPhone – Installing Custom Fonts Read More »

How to Install Custom Procreate Fonts on Your iPad

First thing’s first, you’ll need to install fonts on your device! You are able to import fonts that are TrueType (.ttf) or OpenType (.otf) on your iPad.

To get started, if you purchased your font from me, you’ll need to download your purchase, and if necessary, unzip the folder. Most newer iPads have this capability built right in. If you’re working with older software, you may need to download a file extractor.

Install Fonts in Procreate Directly

It’s pretty easy to install fonts in Procreate itself (as opposed to your iPad as a whole where the fonts would be available in any app that accesses your system’s installed fonts).

Tap Actions > Add > Add Text. Once you’ve typed the text that you would like to use, tap Edit Style > Import Font. Navigate through the Files app on your device to the folder where you saved your custom font. Tap on the font file to import the font, and it will appear in the Fonts list in Procreate.

Bonus Tip: If you also have an iMac or MacBook, you can share an .otf or .ttf file with your iPad by Airdropping it. You can then select what you want to open the font with – if you choose Procreate from your list, it automatically installs it for you.

See what that looks like below!

If you choose not to take the easy route outlined above, you can install the fonts using another method!  This method below ensures that the fonts are installed directly on your device, rather than available only through Procreate. This method would be handy if you work in Procreate, as well as other apps, like Design Space, Illustrator App, etc.

IMPORTANT: Please be patient and aware of the fact that I, personally, do not make the rules + processes needed for font installation on your iPad or iPhone. I only create the font files, and have literally no control over the operating system, your device’s capabilities, or the rules the developers put in place for a process like this.

I will always recommend that the best experience with my fonts will be on a desktop or laptop machine.

That said, it is absolutely possible to use my fonts on an iPad or iPhone, but you must follow the process below, which includes downloading the files, extracting the files, and a few different steps using third party apps.

Import Your Font to Your Device

01. Download a Font Manager

Your new font(s) will need to be installed using the iOS configuration profile. While there are ways of doing this without an app, it’s easiest to do this by using a font app that configures/installs your new fonts for you.

Using apps like AnyFont, Font Installer, iFont, and other font apps will allow you to download your font file and package it up so that it can easily be installed on your iPad or iPhone. You can install multiple fonts or choose one font to install!

For the purpose of this set of instructions, I’ve chosen to work with iFont – it’s free to use!

This is what the interface looks like!

02. Download Your Custom Font(s)

With some font apps, like the iFont app, you may be able to download Google fonts directly within the app from the font libraries. However, you can also download your Google fonts or custom third party fonts directly from your browser!

You would only need to follow the general download process as you would for any other downloadable file, unzip if necessary, and make sure you know where you saved the file!

iFont has an option to “Find Fonts to Install” — tap that, and then use “Open Files.” Navigate to where you downloaded the font file! Select the font you wish to install.

I’ve chosen to work with my font Grateful Season for this blog post!

03. Install Fonts

After this, it’s smooth sailing! Next, install the font!

In iFont, you can do this by tapping “Installer” at the bottom left corner. It should have a little red bubble to indicate the notification – the red bubble will disappear when you tap.

When you tap Installer, you’ll see the font(s) you selected to install on the left side of your screen with a blue “Install” button. Tap install!

You’ll get a pop-up within the app after this. When prompted to open a configuration profile in your settings app, tap “allow”. Depending on your iPad settings, you may be prompted to enter your passcode.

After you do that, you’ll get a notice that says that the profile was downloaded, and it instructs you to review the profile in Settings if you wish to install the font. When you tap “Close” on the notice, you’ll find a set of instructions for what you need to do next.  Follow those instructions! (You can tap “Cancel” in the upper right corner of the pop-up to get rid of this before you go to your iPad Settings.)

You will receive a warning that the profile isn’t signed with a key because it was generated on your device. But don’t worry! You can see for yourself by tapping “More Details” and viewing exactly what’s inside: simply the fonts installed by you! A screencap of what that looks like is below!

Continue tapping Install for any other windows that pop up.

Now, tap “Done” when you receive the notification that it was installed.

04. Use Your Own Fonts in Procreate

Now that you’ve installed your custom fonts, they will appear beside the default fonts in Procreate in the font list. Simply choose your font in the list and use it to your heart’s content to enhance your illustrations and designs!

Pro Tip: If you’d like to use the alternate characters in the font, you can download the paid app Unicode Character Viewer. The app is .99 cents, and will allow you to look up fonts installed on your device, copy the glyph you’d like to use, and then paste the glyph into Procreate.

Uninstalling Fonts

If you’ve decided that you’ve had enough of a new font and want to remove it, you can navigate to Settings > General > Profiles. Here, you can select a font profile and tap “Remove Profile” to remove the font from your system.

If you think a video demonstration would be more helpful to you, I have a video of how to install fonts for Procreate here.  Additionally, if you’re interested in the process to use special characters in Procreate, you can find that demonstration here.

How to Install Custom Procreate Fonts on Your iPad Read More »

Scroll to Top

Hi, I'm Beck!

Receive exclusive offers & freebies when you sign up for my mailing list!