Here’s the TL;DR summary!
- Yes, you can use custom fonts in Cricut Design Space!
- You need to install the font on your computer first.
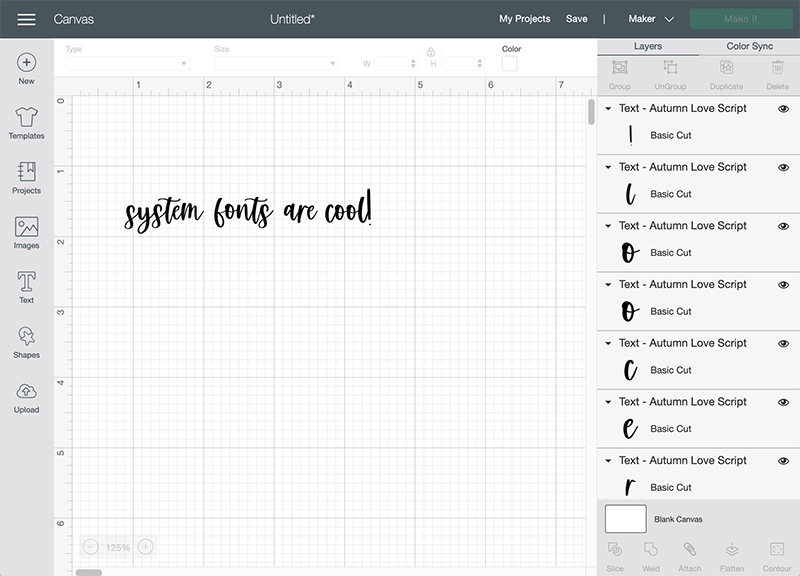
- Look in the System Fonts section of Design Space for your newly installed fonts.
- Design to your heart’s content!
It’s been a minute since I offered up a how-to post, so today we’re going to be addressing how to add fonts to Cricut Design Space.
Here’s the deal. Cricut is the machine, and Design Space is the software you’re using. You can absolutely, positively use custom fonts in Design Space! In fact, you can use any fonts installed on your computer in Design Space.
This is a question I get quite often, especially as it relates to my font bundles…and even more specifically, as it relates to my biggest Handlettered Font Bundle. I get it – for a lot of folks, it feels like a little bit of an investment into their crafting hobby or business! You definitely want to make sure that the fonts are going to work with your software first! Since I provide .otf and .ttf files, you’re golden.
Let me tell you how to do the thing!
You Can’t Upload Fonts to Cricut Design Space.
Don’t worry, though, your project you’ve gotten ready to create is still safe – let me tell you the biggest mistake that Design Space users make as it relates to custom fonts. And before you ask, no, trying to upload them using an iPhone isn’t the biggest mistake I see.
Many of them try to directly upload the fonts to Cricut Design Space.
That won’t work, my friends. This usually results in a frantic email to me, telling me that my fonts “don’t work” in Design Space, they keep getting an error message no matter how many times they try to upload it to Design Space, and it’s entirely the “wrong file type.”
The fonts do work, they are the correct file type – you just need a quick tutorial on what you need to do.
Spoiler alert: It’s really simple.
Just Install the Font File on Your Computer
You need to install the font on your machine first. This is the very first step that you need to take in order to add fonts to Cricut Design Space; I promise, it works!
Getting Your Fonts to Cricut Design Space
Let me give you a quick step-by-step on how to install fonts on your computer! (Just as a heads up, you can find this exact same information on my blog post about how to install fonts – this particular post is just a little more geared toward Design Space users!) These instructions will work with any font download that you find, whether it’s fonts you purchased from me, another designer, or even font downloads from a website that offers free fonts for anyone to download!
I provide OpenType and True Type files in my downloads, as well as webfonts. I would recommend working with the OpenType version – it’s the one that ends in .otf in the zip folder that contains your font download!
Mac Instructions – follow these simple steps!
1. First, download the font!
Once downloaded, you’ll need to access your browser downloads the same way you would any other download. You’ll want to save the files to your computer — the easiest way would be to drag to your desktop. My font files (.otf, .ttf, and web font files) are zipped up together. You’ll need to extract the files first. This should be a simple double click on the zipped up file, and confirming any dialog boxes that pop up.

2. Extract (Unzip) The Font Files
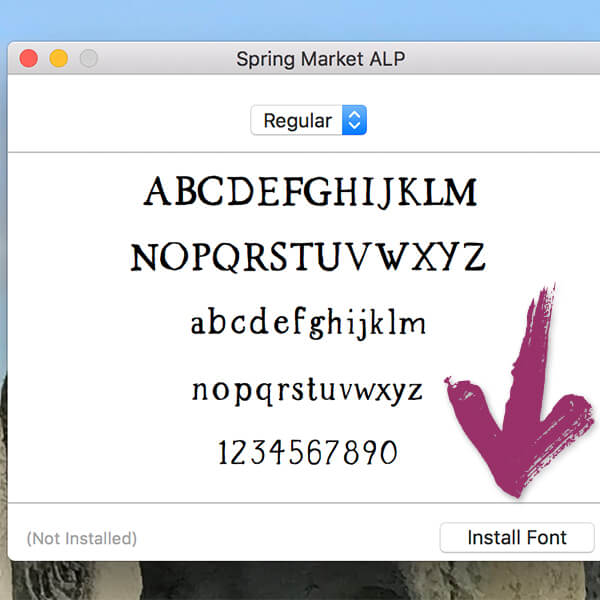
Once the folder is unzipped, it’ll reveal the contents I previously mentioned. I provide various formats for your convenience, but you will only need to install a single file. I would recommend the .otf file for installation. Double-click the file, or right click on the file so that the menu appears. (Image on the left of the right click option!) Select Font Book when it appears from the Open With menu.
Side note with a little info: FontBook is the program that comes standard on a Mac machine to assist with font installation and organization. It also functions to provide a glimpse of the glyphs that are included in the font.
3. Install the Font File
FontBook will pop up with a little window for installation. Click the “Install” button. Similarly, you can copy/paste the font file directly into your computer’s font folder. Command+Shift+C will bring up your computer. Double-click Macintosh HD (or whatever your hard drive is named), then double-click the Library folder. Within the Library folder, you’ll find the Fonts folder. Paste the font files in this folder – pasting the .otf in this folder means that it’s automatically installed on your system.
PC Instructions – for Windows Users
1. First, download the font!
Once downloaded, you’ll need to access your browser downloads the same way you would any other download. You’ll want to save the files to your computer — the easiest way would be to drag to your desktop. My fonts (.otf, .ttf, and web fonts) are zipped up together. You’ll need to extract the files first. This should be a simple double click on the zipped up file, and confirming any dialog boxes that pop up. Overall, the process is the same for any Windows machine.
2. Extract (Unzip) The Font Files
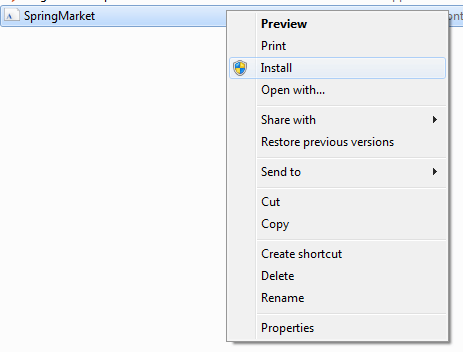
Once the folder is unzipped, it’ll reveal the contents I previously mentioned. I provide various formats for your convenience, but you will only need to install a single file. I would recommend the .otf file for installation. Double-click the file, or right click on the file so that the menu appears. (Image below of the right click option!)
3. Install the Font File
For a Windows machine, you can right click the font file, and then select “Install” from the menu that pops up. You can also copy/paste them into your computer’s font folder. That can be accessed by your Start Menu > Control Panel > Appearance and Themes > Fonts. Simply paste them in there!
I mentioned above that a FontBook on a Mac machine will allow you to view all characters contained within a font. On a Windows machine, you can use Character Map for this! I personally use a Mac for all of my design work, but I have used Windows machines before so I’ve been able to use both programs to tool through font selections!

A Few Tips & Tricks
- If the font you just installed doesn’t show up in the program you’re using, restart your program!
- You cannot drag & drop the .zip file into your system’s font folder — make sure you unzip it.
- You cannot install the webfonts on your computer; in most cases you won’t ever touch these files.
Using System Fonts in Design Space
Wait, what does “System Fonts” even mean & how do you use it on a project?
That, crafters, is what Design Space calls the fonts that are installed on your computer. The “system” part is your computer – Design Space accesses what you have installed, so you can use the fonts you downloaded in Design Space! You can filter the fonts you have access to in Design Space by selecting the dropdown menu with the text tool. When you select “System Fonts” it’ll bring up everything you have installed on your machine. Easy peasy, right?!
Give it a try!
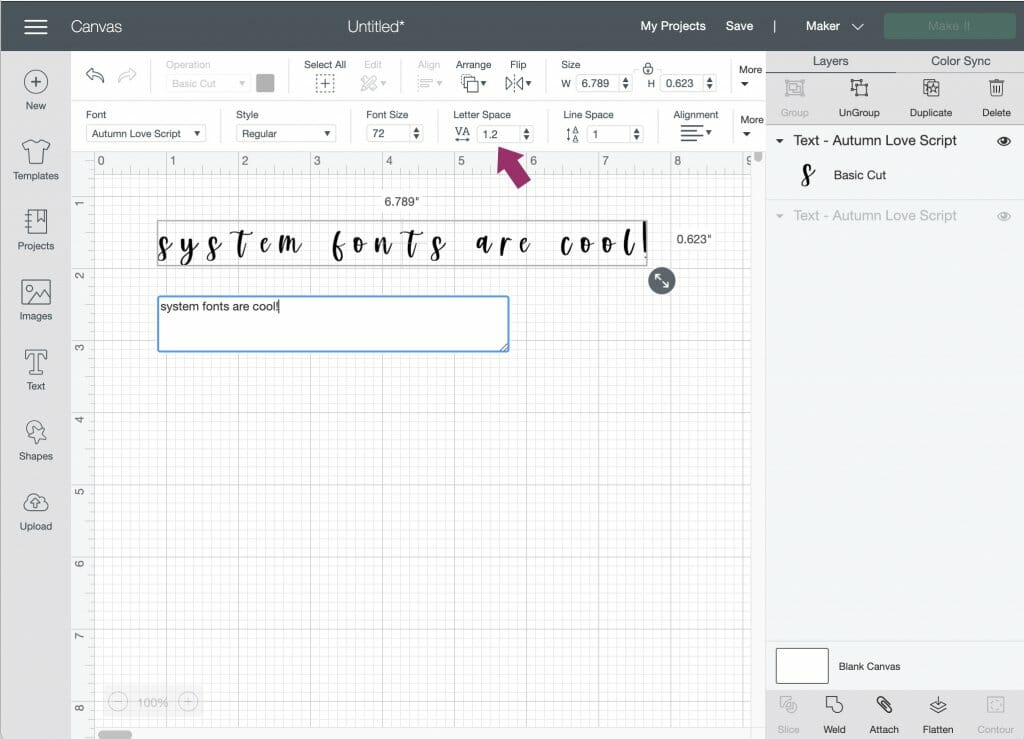
Select a system font of your choice from the font dropdown, and adjust your font size if needed. I picked Autumn Love for this example! I chose a script font for an important reason – this type of font style needs a few adjustments before sending to your Cricut machine for cutting, so I thought it might be a good thing to address.

When you select the text tool, a text box automatically appears.
Now, type!
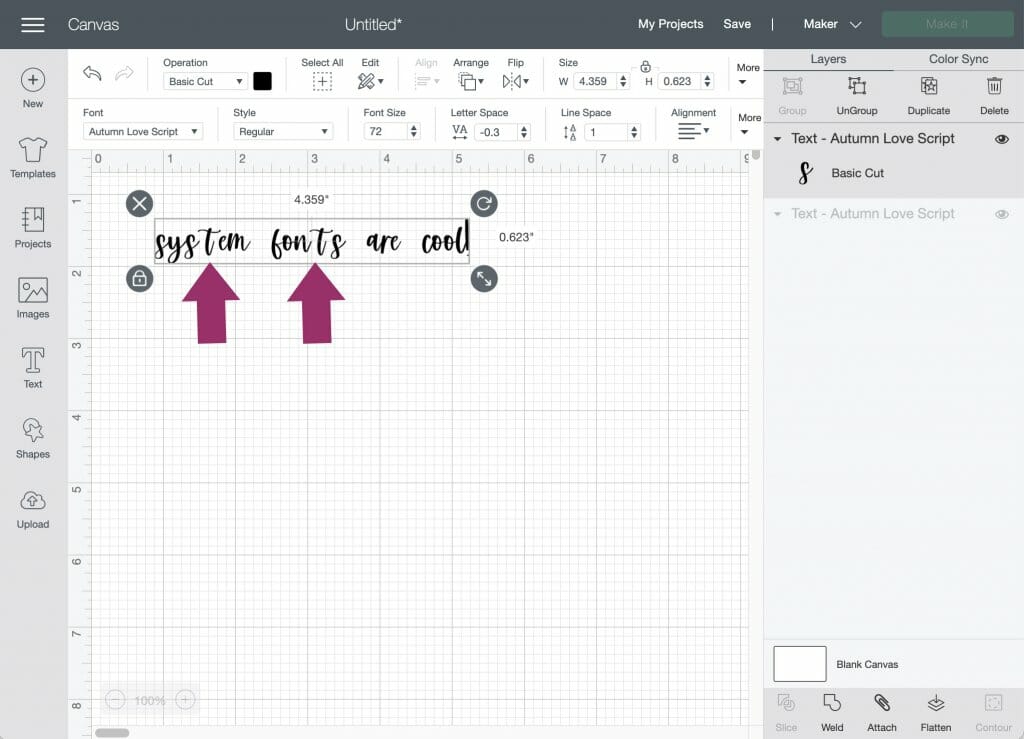
You’ll notice that script fonts have the letters separated. This isn’t “normal” for the font — definitely not the way font designers intend it to look — but this is normal for Design Space. You can adjust the letter spacing pretty easily by making the letter spacing number smaller.
Even after doing this, you may notice some of the letters still aren’t connected – there’s also a simple solution to this. In your Layers panel, click the ungroup button. This puts each letter on its own layer so you can move the characters individually!
Please, for the love of everything fonts, adjust your letter spacing so that the font looks how the designer intended it to. This is probably my biggest pet peeve with Design Space.
You can make use of the search bar to filter your font choices if you know the name of the font you’d like to use, or you can just scroll and find it by the font name!
There are other options in the design panel, but we’ll address how to use those things in another blog post in the future. What’s important is that you’ve got this whole how to add fonts to Cricut thing down!
Make sure before you send to your Cricut machine that you weld the design so that the letters come all the way together as one piece! That is super important whenever you’re using a script font. That’s really all there is to it! Now you’ll be able to use custom fonts for your design projects!
What About Cricut Fonts?
You’ll notice that, in addition to system fonts, you also have the option to select Cricut Fonts as one of the filtering options. Whenever you do, you’ll be faced with a lengthy list of fonts that are available to you, either for free or for an additional (usually small) fee, directly from Cricut.
It’s a quite robust selection, and it does make it quite easy to add to your font collection via the Design Space interface. You can purchase these fonts onesie-twosie, but it’s also important to note that if you have the Cricut Access subscription, you’ll get access to over 500 fonts in Cricut Design Space!
So, what’s the difference between using Cricut Fonts versus finding your own custom fonts, downloading, & installing them? The fact that you get to keep the font files, that’s what! While the Cricut Access subscription is super handy and full of good stuff, you don’t actually get to have the fonts installed on your computer – they’re only available through Design Space. For most folks, that’s not a problem – I would assume that anyone purchasing fonts for their Cricut machine would likely only be using them for the machine…but if you’re a designer like I am, and you routinely make use of fonts in your daily work, it sure is handy to be able to use said fonts in whatever design program you’d like…whether that be using the font in Cricut Design Space, Illustrator, Photoshop…you get the point, right?
A Few Other Tips & Tricks
OpenType fonts (as opposed to True Type) are extremely robust with features and extra design components, and newer versions of software make it easy to find & use those features. Unfortunately, Design Space’s latest edition doesn’t quite fully support OpenType features as readily as font designers like me would want. (True Type fonts do include the features, as well, but they’re not as easily accessible with that particular file type.)
I often get asked, “How do you get those swooshy lines?” or “Where do I find the letters with the hearts?”
Those are the OpenType features. But don’t worry, you can still use them in Design Space; it just takes a few extra steps. One of my most referenced tutorials is for accessing OpenType features, so I would highly recommend heading there to read about how to get to all of the extra features. In a nutshell, though, you’ll need to locate the special character, then copy/paste the extra characters from Character Map (if you’re using a Windows machine) or FontBook (if you’re on a Mac). It may be a little tedious at first, but once you understand the process, it’s only a few extra steps to take your design from nice to WOW.
I will eventually be putting together a step by step blog post, but there are tutorials that already exist for this type of thing that you can search for!
Do you want a huge selection of fonts in Cricut Design Space?
Check out my Handlettered Font Bundle. Yes, you had to know I’d throw a shameless plug in there. But also, crafters purchase this bundle all the time – it’s got so many awesome fonts in there that are perfect for cutting because they have a super smooth edge. Using handlettered fonts like these give your project an extra special look & feel! I know the number of projects is endless, but I especially love seeing these fonts being used for t shirts and mug designs – I’ve also seen a few crafts where the fonts were used to make lovely greeting cards, which I thought was a great idea!
This particular bundle is awesome because it includes so many fonts – more than 200!! Don’t worry about licensing, either – it includes personal and commercial use, so you can sell the crafts you make using these fonts!
